Saturday, December 19, 2009

In honor of Gourmet


I have been receiving Gourmet, monthly, since 1990 and, until a few years ago when I began clipping the recipes I wanted to try and then recycling the remainder of the magazine, I saved them all. I guess I'm a pack rat of sorts, honestly come by via my Dad. My kitchen is packed with over a hundred cookbooks as well as assorted issues of Bon Appetit, Food and Wine and my shelf of Gourmet. These magazines somehow made the cut (or wholesale purge of extraneous possessions) during moves in 1990, 1994 and 2006. With each move, the commitment was greater - the first time, there were fewer than a year's worth, while during the last move they filled a couple of boxes. A few months ago, I considered tossing them, or maybe donating them to a school yard sale, but didn't and now that Gourmet has closed up shop, I'm so glad I saved them.

I've always enjoyed reading Gourmet, even in the earlier days when I worked long hours and carry out was my best friend. Cook or no, there was much to love about the magazine, with it's literary articles, glossy photos that draw you right up to the table and the extensive travel features. All you needed was a love of food. For me, travel is always intricately tied in to the food of the locale, so I loved reading about how food affected and even guided other people's trips. This was especially so after Ruth Reichl took over. It's been a treat to travel the world with Gourmet.While many of the recipes might have been more complicated or time consuming than I would make regularly, others have been simple and delicious.

I've been skimming some of the collection lately and am planning to participate in a monthly project in which food bloggers cook an item from that month's issue from any year, and then submit it to one central blog called Gourmet, Unbound. Sort of a Gourmet tribute blog. In preparation for the January event, I made a soup from the January 1990 issue - my very first - called Portuguese Kale and Potato Soup.
I prepared this soup in anticipation of a snow storm cum blizzard which eventually dropped 23 inches of snow according the the tv news. Pretty unusual for the DC area! We initially ate it as we watched out the window for the snow to begin, which unfortunately happened before our teenaged son could get home from an evening activity. The snow began falling around 9 p.m., and the roads iced up pretty quickly, making for a white-knuckle trip home for him around 10 p.m. By morning, we must have had almost a foot of snow. We cleared the walkway and front steps, window well covers, HVAC units and the car left outside and parts of the driveway a total of three times, twice on Saturday and again on Sunday. Between the two bouts of shoveling on Saturday, we were able to eat the leftovers for a warming and delicious lunch.

I had planned to use the kale I had growing in my outdoor ornamental pots, sort of a pre-snow final harvest, but the plants were saggy and wan due to the recent cold snap. Instead, I used some really perky and bright chard I had found at the grocery store earlier in the week and had not yet figured out how or when I would use. While at the store in a final pre-storm shopping trip, I also tried to replace the moldy chorizo that had been hiding in my deli bin for more months than I can remember. Though successful with the chard, I was unable to find chorizo in that store and substituted Portugese linguica sausage which is pretty similar. I figured that it's a Portuguese soup anyway. In fact, this is really a caldo verde, which should use linguica. Lastly, I didn't even bother to remove the russet potatoes from the pot to a blender. I simply crushed the chunks against the side of the pot with the back of my spoon.

Healthwise, with a pork sausage, there's always a little fat. However, you could easily substitute a lower-fat spicy turkey or chicken andouille sausage. As always, though, check the sodium content on the stock and sausage! With all the greens, and carrots, though, this is not so bad a choice, especially after a good shovelling workout.

Funny, as I searched Epicurious for a link to the recipe, I found that in the last issue Gourmet published, November 2009, they included a similar soup. While they didn't rename it, this time they acknowledge that the soup is actually a Portuguese caldo verde, and recommend using either chourico or linguica sausage, as I did.

It was delicious and warming for this time of year, and relatively easy to prepare. You can find the recipe as printed in 1990 at:

Monday, December 14, 2009

Comfort Mash

Celeriac (seh-LER-ee-ak - I finally looked up the pronunciation!) or celery root is a knobby, brown skinned vegetable with cream colored flesh that has a taste similar to celery with a little more bite. It is actually the root of a type of celery grown specifically for its root, rather than the root of the type of celery we commonly eat. It's currently available at farm markets and is about the size of a baseball or softball. It's a lot less ugly once you peel it.


Not long ago I cut some up and roasted the pieces with carrots, onions and potatoes. Not a success. I was the only one who ate the celeriac bits and virtually every other piece (save for the three the others tasted) was left to sit forlornly in the pan. In this recipe, however, my family ate the celeriac happily, or at least without complaint. In a mash or puree with potatoes, the celeriac provides a welcome bite and a dash of extra flavor which comes in handy when you're limiting the fat in the recipe. I did this mash with chives, skim milk and just one tablespoon of butter for the whole bowl. To my taste, this is good stuff.

You can prepare this as a puree if you like, by running the potatoes and celeriac through a ricer, or you can simply mash the potatoes with a regular old potato masher. I usually opt for the latter as I like a thicker consistency to my mashed potatoes. This is a milder dish though, than a rustic smashed potato with olive oil, which I also love. This one looks a little more refined and would be great with the mustard crusted salmon I wrote about in my March 10, 2009 post. Though the dish does technically contain a vegetable along with the potatoes, I like to also serve a green vegetable alongside to provide some color contrast on the plate.


Comfort Mash

(serves 6)

2 pounds Yukon Gold potatoes, peeled and cut into 1 inch chunks

1 celeriac knob, preferable one closer to baseball sized than softball sized), peeled and cut into chunks smaller than the potatoes

1/2 - 1 cup skim milk

1 tablespoon olive oil

3 tablespoons chives, minced

1 tablespoon butter

salt and pepper to taste


1. Put the potato and celeriac into a large saucepan and cover with cool water by about 2 inches. Bring to a boil over high heat and then reduce the heat to medium - low and simmer for 20 to 25 minutes. Check a chunk of celeriac and a chunk of potato with a fork to see if soft.

2. Drain the vegetables in a colander and return them to the saucepan over medium heat. Stir the potato and celeriac around in the pot for a couple of minutes to dry them out. Turn the heat to low and either mash the potatoes in the pot or if you want a finer, more pureed consistency, put the vegetables through a ricer (and put the puree back in the pot). Add the skim milk, one half cup at a time, and the olive oil. Mix well. Add the second half cup of milk if it seems too dry. Add the chives and butter and mix again and then add salt and pepper, started with about a quarter teaspoon of salt and a few grinds of pepper, adding more to taste.

Monday, December 7, 2009

Odds and Ends

First, I'd like to give kudos to "Mrs. Wheelbarrow" for her stunningly good and simple challah and veggie stuffing that I linked to before Thanksgiving via food52.com. After many years of trial and error and many different stuffings, this one is a keeper. The outside got nice and crispy while the inside was just a little creamy. I adapted her recipe only minimally, using turkey stock instead of vegetable and adding a little extra stock so I could cut the amount of butter. I also used a mix of both cremini and chanterelle mushrooms instead of the button mushroom stems. I made a double recipe and still, there was not a bit left.

Next, I'd just like to bore you all, briefly, with another public health/food concern. Consumer Reports has discovered that much like with feedlot cattle, feedlot chickens have a higher incidence of bacteria, etc. The organic and air chilled chickens had a lower incidence of contaminants. Wonder what would have happened if they tested pastured chickens from small farms. Whatever type of chicken you buy, it's crucial to keep the raw chicken and any of it's liquids from contaminating the rest of your kitchen and grocery bag. The Well column in the New York Times had some suggestions for this: http://well.blogs.nytimes.com/2009/11/30/how-safe-is-your-chicken-dinner/.

Lastly, I have been wanting to mention that I had my cholesterol and other related blood work done a few weeks ago and was very gratified by the results. Just about all of my numbers are significantly better than a year ago, and, frankly, for most people, the numbers weren't all that bad to begin with. While this is in no way scientific, I do believe that the improvement is directly related to sticking with my exercise plan and eating a healthier diet. This has included eating less fat, sodium and refined flour products, and more vegetables, wild salmon, oatmeal, walnuts and other foods high in Omega-3s.

Monday, November 30, 2009

Cranberry Oat Bars

For the first time, I am enjoying some experimentation with fresh cranberries. After a few unsuccessful attempts at homemade cranberry sauce that just didn't surpass the guilty pleasure of the canned jell, I gave up trying a few years ago. I mean, who doesn't love ridges that let you know precisely where to cut the jiggling goo into perfect slices? Trader Joe's has a pretty good cranberry chutney that I liked for a while, but this year, a very simple recipe that I linked to last week revived my interest in the bags of fresh cranberries that are piled high in all the stores these days. I've made that recipe several times now, and expect that I will continue making it through the winter. Cranberries freeze well, so you can stock up now and have some available until next Thanksgiving.

Recently, I came across a recipe for cranberry oat bars that looked appealing and seemed easily adaptable to qualify as a "healthier" dessert with a one-to-one switch of whole wheat pastry flour for the specified white flour. Unfortunately, I had completely missed the last line of the ingredient list which called for 1 and 1/2 sticks of butter. By the time I noticed this little deal breaker, I had already preheated the oven, put the cranberries, sugar and orange zest into a saucepan, and, most importantly, had already started craving the taste of one of these bars. I guess that's why it's better to prep the whole dish before starting the recipe.

What to do? I kept one half stick of butter in the recipe as I thought the crust would require some. I substituted one half cup of canola oil for another half stick. Lastly, as there was already orange zest in the filling, I used 4 tablespoons of frozen orange juice concentrate that I had in my freezer, instead of the third half stick.

Though more butter might have produced a crisper crust, we loved the tart flavor and texture of these cranberry bars. The oats, which I really like, come through loud and clear. This is still a dessert, though it is probably not any worse than some of the granola bars and lunchbox snacks floating around.

Cranberry Oat Bars

(greatly adapted from the Washington Post, which says it adapted it from Rick Rodgers' Christmas 101: 100 Festive Recipes With Menus and Timetables for Stress-Free Holiday Entertaining. At this point, who knows?)

makes 16 bars

for the filling:

2 cups fresh cranberries
3/4 cup sugar (I used organic cane sugar)
zest of 1 large orange (get out the Microplane!)
3 tablespoons water

for the crust:

1 1/2 cups whole wheat pastry flour
1 1/2 cups old fashioned rolled oats (not the quick cooking or instant kind)
1 cup packed brown sugar
1 teaspoon baking powder
1/2 teaspoon salt
4 tablespoons chilled, unsalted butter (1/2 stick) cut into small cubes
1/2 cup canola oil
3 - 4 tablespoons frozen orange juice concentrate

1. Preheat oven to 350 degrees. Spray an 8 inch square baking pan with cooking spray.

2. Place cranberries, sugar, orange zest and water into a medium saucepan over medium-high heat. Bring to a boil, stirring to dissolve the sugar. Lower heat to medium and let the mixture simmer for about 5 - 10 more minutes, stirring often, until the mixture has thickened and reduced a bit. Take off the heat and let cool.

3. In a mixing bowl, combine the flour, oats, brown sugar, baking powder and salt. Add the butter cubes and with your fingers, begin to work it into the dry ingredients. Once partly combined, add the oil and 3 tablespoons of the orange juice concentrate and continue using fingertips until wet ingredients are well incorporated. If it feels too dry to be able to mold a little, add another tablespoon of the orange juice concentrate and incorporate.

4. Press half the flour/oat mixture into the greased pan so that the bottom of the pan is entirely covered. Spread the cooled cranberry filling on top. Sprinkle the rest of the flour/oat mixture over top of the cranberry filling and tap it down gently so that the top is even and all the cranberry mixture is covered.

5. Bake on the middle rack for about 45 minutes, until the top is nicely browned. Take pan out of oven and let cool completely.

6. Cut into 16 bars. Once bars are removed from pan, let bars cool further. Store in a container with a tight fitting lid.

Monday, November 23, 2009

This is a Bird Free Blog

It seems that every blog, magazine, newspaper food section and cooking show is all Thanksgiving all the time right about now. I have been lucky enough not to make Thanksgiving dinner in several years (thanks Karen and Jon!!!), instead hosting a big buffet the following evening, with many cousins and extended family in attendance. It's more people, but no china required. As a result, I'm bursting with seasonal recipes and versatile ideas for a fall potluck or a winter dinner party. Thanksgiving dinner? Not so much. So I'll remain silent and defer to some others who have some great holiday recipes.

For a really easy cranberry sauce that is fresh and tart, check out Bea at La Tartine Gourmande's recipe here: http://latartinegourmande.com/2009/10/12/cranberry-harvest-in-new-england. I've tried it both as-is, and substituting half the sugar for agave nectar and although both taste great, the recipe, as written with the sugar, has a better consistency. I took Bea's advice and have been swirling some into my morning yogurt!

For stuffing, check out the stuffing contest on http://www.food52.com/. I am torn between the two finalists: one is a vegetarian stuffing featuring challah or brioche with mushrooms, celery and vegetable stock, and the other using ciabatta, sweet potato, shiitake mushrooms and chorizo. I might make both to bring to Thanksgiving dinner!

I will be spending Thanksgiving and the days before and after, with my extended family. We'll share many meals and conversation, and hopefully some long walks in the park as well. Whatever your plans, I hope you enjoy a very happy Thanksgiving!

Monday, November 16, 2009

Fall Farro Salad


I first came across farro a few years ago in a cookbook by Giada De Laurentiis, in which she used farro as the grain to support a coarse herb pesto. I've made that dish many times with great success and often bring it to picnics and other summer events. I've been a fan of farro ever since. The taste is a little nutty and the texture a little chewy, in a good way, and it provides a welcome and healthy change from the usual pasta.

According to the Food Lover's Companion, farro is a wheat grain grown and used in Italy since ancient times. It is also known as emmer wheat and although it looks like the much less expensive spelt, it is not the same grain. Please don't make the mistake I made and substitute the one for the other as whole spelt grains take forever, I mean forever, to soften up to an edible texture. After I'd been purchasing farro for a while at Balducci's, one day they no longer had it. During my quest for another source, I tried my local organic market, where a helpful clerk assured me spelt was the same thing. I learned after attempting to cook the dish I'd made many times before, that spelt just doesn't want to loosen up. I pretty much simmered it to death and was still left with hard bits of rock instead of the tasty chewy kernels I usually had.

In the couple of years since, farro has become more readily available. I try to buy it at my local Italian grocery as it's least expensive there. They still have it at Balducci's, and now have it at Whole Foods and that same organic market that mislead me with its bulk spelt. Many regular grocery stores carry it now too. The only brand I've ever seen, though, is rustichella d'abruzzo from Italy. I've seen it anywhere from $7.00 to $10.00 for a 1.1 pound package, which seems like a lot until you see how much the farro grows during cooking and how many this one pound-ish package serves.

I've been seeing more and more recipes lately using farro in the risotto style - sometimes called farrotto - and in lieu of pasta in other dishes and soups. I call this dish a salad because I finish it with what amounts to a vinaigrette, but it can be served hot, cold or at room temperature. One of the beauties of farro is that it doesn't get soggy in sauce or dressing and doesn't harden up in the refrigerator.

This recipe can be adapted quite easily to become vegetarian. I use a little pancetta or prosciutto to start it off, but you could easily substitute caramelized onions for the smoky flavor (see my April 02, 2009 post on caramelized onions!). Just substitute vegetable stock or water for the chicken stock and you'll be all set.

Though I don't actually include them in the recipe, you also see brussels sprouts in the photo above. I added them in this time as I had some sitting around in the refrigerator. If you want to add brussels sprouts, add them halfway through the time for the cauliflower to cook as they cook much more quickly.

While the instructions on the package of farro advise you to soak the farro before cooking, I've never needed to when I've cooked it this way. This is a delicious complement to fish, chicken or meat. I've made it with all of them.
This is what the package looks like:


Fall Farro Salad


(serves 8 - 10 when served as a hearty side dish)


1 large head cauliflower, cut up into small florets
2 tablespoons olive oil
sprinkle of salt
4 cups no or low sodium added chicken or vegetable stock (if making vegetarian version)
4 cups water
1.1 pound package of farro, rinsed
4 ounces pancetta or bacon, diced
1 medium red onion, diced
1 carrot, diced
1 large stalk celery, diced
1/4 cup chopped parsley
2 tablespoons chopped fresh oregano
1/4 cup chopped fresh chives
juice of one large lemon
1/4 cup olive oil
salt and pepper to taste
handful rinsed capers, optional


1. Preheat oven to 450 degrees F.

2. Toss the cut up cauliflower with 2 tablespoons of olive oil in a Ziploc bag or bowl. Make sure all pieces are coated with olive oil. Spread cauliflower in a single layer in a shallow baking dish. I use a half sheet pan lined with foil. Sprinkle a pinch of salt over cauliflower.

3. Let cauliflower roast, stirring and turning pieces over occasionally, until tender and golden brown, about 25 - 35 minutes.

4. While cauliflower roasts, bring the stock and water to a boil in a large saucepan over high heat. Once the stock boils, add the rinsed farro and stir. Reduce the heat to low and simmer the farro, covered, until tender, about 20 - 25 minutes. Drain farro and set aside in a large serving bowl.

5. Meanwhile, in a Dutch oven or large pot over medium heat, saute the diced pancetta until it darkens and gets a little crispy. Add the onion, carrot and celery and cook, stirring frequently, until onion is translucent and carrot has softened, about 10 minutes. You can season these vegetables lightly with salt and pepper while they cook, if you like.

6. Add onion mixture to serving bowl with farro.

7. Add cooked cauliflower to serving bowl.

8. Add parsley, oregano and half the chives to serving bowl.

9. Add lemon juice and olive oil to serving bowl and mix contents well. Taste for salt and pepper and add if necessary.

10. Garnish with remaining chives and some capers if you like a little extra, salty tang.

Tuesday, November 10, 2009

And Now for Something a Little Different


Smoked trout pate is not the most practical dish I've ever made, but once I indulged myself by purchasing the smoked trout offered by the fish seller at my local farm market, I had to come up with something to do with the one pound plus piece of smoked local fish. I served this as an hors d'oeuvre at a potluck dinner recently and one guest told me "I just can't stop eating this!" We liked it so much, I made it again the following weekend with the rest of the fish! I got the idea after reading a small blurb that a chef in NY makes her restaurant's trout pate with cottage cheese and creme fraiche, with no actual recipe given. I just experimented until I got a taste I liked.

Once you have the ingredients, this is as easy as can be to put together. This is also a dish that you can adapt to your taste and play around with the ingredients and quantities a little. The first variable is the fish. Taste a piece before you begin mixing. Some will be saltier than others. Mine was not salty at all, just smoky, so I added salt at the end. Likewise, choose the kind of cottage cheese you prefer, but a smaller curd would definitely be preferable. I use 2%, but you could try 1%, no sodium added, or, if you want something really rich, full fat. The creme fraiche transforms this from an everyday recipe in terms of health, to a once-in-a-while treat, but who doesn't need a treat every now and then.


Smoked Trout Pate


(serves a small dinner party as one of an assortment of hors d'oeuvres with cocktails)


Smoked trout fillet (about 1/2 pound)
2/3 cup cottage cheese
2 heaping tablespoons creme fraiche
1/4 cup chopped fresh chives
olive oil, salt and pepper to taste


1. Remove the skin from the fish and discard. Crumble or flake the fish into a bowl using two forks (one in each hand moving away from each other in the bowl) or your hands if you prefer. If the top of your fillet has a hard crust from the smoking process, you can pick out the larger, hard bits if you prefer. I like to leave in most, as they have the smoky flavor, but I try to make sure to break them down.

2. Add cottage cheese and creme fraiche and mix well with a spoon. If the mixture seems dry, add another dollop of cottage cheese. I like a smooth consistency so using the back of the spoon, I "smoothed out" some of the cottage cheese curds against the side of the bowl.

3. Sprinkle a pinch of salt (if your fish isn't particularly salty), a couple of grinds of pepper and 2 teaspoons of olive oil into the bowl and mix well.

4. Add chives, reserving a pinch for a garnish. Mix gently, and taste - add salt if need be.

5. Put into serving bowl and sprinkle the remaining chives on top. If not serving right away, refrigerate, but take it out about 1/2 hour before serving so it can come to room temperature which will make spreading easier. Serve with thin slices of baguette.

Friday, October 30, 2009

Sunday in the Rain


Sunday mornings have taken on a new routine around our house. After breakfast and some quality time with the newspapers, Paul and I have been heading over to the Bethesda Central Farm Market. It's a reminder of years past when both kids were in Sunday school and we would have "date morning," going to the gym and then strolling through the market in Dupont Circle before settling down with some coffee and the New York Times crossword puzzle.


We have come to know many of the vendors that we visit each week, and even recognize some of the regular shoppers. We have purchased everything from cider to merguez sausage, from bag your own lettuce mix to fresh trout to cheese. There are fruit and vegetable vendors, a fish seller, several farmers selling grass fed beef, bison, lamb and pastured chicken. We love stopping at all the stands to see what is new and different each week, tasting a piece of sausage here, an oyster there. Several weeks ago, there was a pizza truck there, run by three Italian brothers making Neapolitan pizzas in the built in pizza oven.


This past Sunday was a little different, as the light drizzle turned into a steady downpour just as we arrived. Many of the spots were empty and there were many fewer shoppers, but we bought some halibut from Mr. Lingenfelter and a baguette from the Atwater Bakery. Despite the weather, we were compelled to buy not one, but two containers of Pitango Gelato for the second week in a row. Last week was chocolate with dark chocolate chips and strawberry sorbet; this week we fell prey to the tasting spoons of espresso and cinnamon.


One of my favorite things to buy at the market for a weeknight dinner is a package of chicken thighs. They are easy to cook and difficult to overcook. Often, I just slather on a little mustard and then sprinkle some bread crumbs on top. Other times, I look for something different.
Though the cooking time takes this recipe just slightly out of my preferred time range of 30 to 45 minutes for a weeknight dinner, the preparation for this recipe is minimal and then the chicken just does its own thing in the oven leaving you time to assist with homework, reading, coloring , or preparing a side dish. I made these last week on the night that I had to take one child to a drama class at 6:30. I popped them in the oven before leaving and as the other child, a "responsible" teen, was home, left them to roast while I dropped drama girl off and came back. You could easily throw some potatoes or cauliflower in to roast at the same time and dinner would be complete. That night, I roasted some cut up fingerling sweet potatoes I'd bought at the farm stand the week prior, and then sauteed some kale when I returned home.


This is another delicious Ellie Krieger recipe from The Food You Crave (Taunton Press, 2008).

Maple-Mustard Chicken Thighs
(Serves 4 - two pieces per person)

8 bone-in chicken thighs (about 2 1/2 pounds), skin removed
1/3 cup grainy French mustard
1 clove garlic, minced (about 1 teaspoon)
3/4 teaspoon dried marjoram (I didn't have any so I substituted 1/2 teaspoon dried oregano)
3 tablespoons pure maple syrup

Preheat the oven to 375 degrees F. Rinse the chicken and pat dry with paper towels.

Combine the mustard, garlic, marjoram (or oregano), and maple syrup in a small bowl. Spread about 1 tablespoon of the mustard mixture evenly on top of each chicken thigh, being careful to cover as much of the surface as possible to form a "crust." Arrange the chicken in a single layer in a large baking dish. Bake until mustard mixture has formed a crust and is slightly hardened, and the juices run clear when the chicken is pierced in the center, 45 to 50 minutes.

Monday, October 19, 2009

Ellie Krieger's Lasagna Rollups


I love pasta. My family loves pasta. We are conflicted about our strong preference for pasta. Or at least I am. As I've committed to cutting back on the "white stuff" I have definitely turned pasta into more of a special dinner than an everyday event. And, I keep trying to find a whole grain pasta that I can love. In the meantime, I've limited whole grain pasta to use in dishes that feature vegetables and nuts which complement the flavor of the heavier, grainier flavor of whole wheat pasta.


My feeling is that for that once in a while Italian favorite, don't mess with the white stuff. I've said this before, but I just can't subject my family to a delicious, long cooked Bolognese, for example...on top of whole grain pasta. It would be like serving it with a seedy, sprouted, whole grain bread, which though it can be delicious toasted and topped with almond butter or jam, for example, or in a sandwich with turkey, avocado and white bean spread, just doesn't go with a traditional Italian specialty. Some things we just don't mess with. In our house, Bolognese gets white pasta, usually penne, and a baguette. Since a sauce like this is a once in a while dinner around here, I figure that's OK.


I've recently noticed a quiet revolution in the whole wheat pasta area that gives me hope that we can incorporate a little more pasta back in to our regular rotation. Many Italian producers have begun making whole wheat versions that are significantly better in both taste and texture than the first brands I tried a couple of years ago. I think the texture has been the biggest obstacle for me with whole wheat pasta - it tends to be stiffer and chewier than white pasta. And not in a good way.

A couple of recent purchases have put some of those concerns to bed. I recently tried Garofalo brand whole wheat spaghetti, which cooked in about the same amount of time as regular spaghetti, and had much more of a regular spaghetti texture. I made it with roasted vegetables, but I will definitely try this one in more dishes in the future.


I'm sharing this recipe with you straight from the cookbook though I've inserted a few of my own suggestions in brackets. This is one of the few recipes I haven't messed with and usually make exactly as is. I highly recommend Ellie Krieger's book The Food You Crave to anyone looking for recipes that are both healthier and still delicious. I've liked everything I've made from this book, and it also provides the nutrition information (just so you know, I am not being compensated to say this. I really like this book).


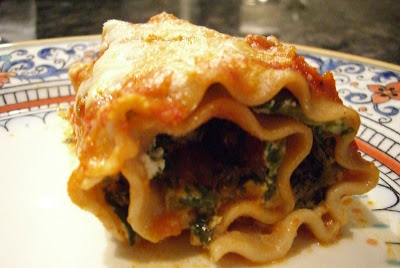
For this recipe, I use whatever brand whole wheat lasagna noodles I can find, and I haven't been disappointed in any. In this recipe, the taste and texture of whole wheat work beautifully. This is a hearty vegetarian meal that I have served to children (not just my own, who we know will at least try anything I serve). It's not a weeknight dinner for us, as it takes just a little too long for everyday, but it's a great Sunday evening dinner and the leftovers are great for lunch the next day. It's a lovely presentation although my photo does not do it justice at all.


The recipe includes a home made sauce, but mostly I use a good jarred marinara sauce to speed things up. I have found many brands that are not too high in sodium. Just use your favorite. An eggplant or artichoke sauce would be great too. I find that although the recipe calls for the rolls to either bake sitting upright or flat, the noodles are just a little too wide for them to sit upright easily in the pans I have. If you have a really deep pan, it would be fine. So I usually lay them flat. Once, though, in a fit of ambition, I cut the already cooked lasagna noodles lengthwise down the middle so that they were thinner. When I rolled them up they were not as high when seated upright in the pan. This is actually a better size for smaller children. If you do this, just remember to sit them with the ruffled side up for a nicer presentation.

 
Portobello Lasagna Rollups with Easy Tomato Sauce
(reprinted, with permission, from The Food You Crave by Ellie Krieger,
Taunton Press, 2008)


12 whole-wheat lasagna noodles (about 3/4 pound) [W: I have found this is 1 1/2 boxes of whole wheat noodles]
2 teaspoons olive oil
12 ounces portobello mushrooms, chopped [W - you can find these presliced]
1/2 teaspoon salt
4 cups Easy Tomato Sauce (recipe follows) or store-bought marinara sauce
One 15-ounce container part-skim ricotta cheese
One 10-ounce package frozen chopped spinach, thawed, drained, and squeezed dry
1 large egg, lightly beaten
Freshly ground black pepper
Pinch of ground nutmeg
1/4 cup freshly grated Parmesan cheese
3/4 cup grated part-skim mozzarella cheese (3 ounces)


Preheat the oven to 375°F.
Cook the noodles according to the package directions. Drain well and spread them out on a sheet of aluminum foil or waxed paper to prevent them from sticking [W: I use waxed paper sprayed with cooking spray].
Heat the oil in a large skillet over medium-high heat. Add the mushrooms and cook, stirring occasionally, until browned and all the liquid has evaporated, about 5 minutes. Season with 1/4 teaspoon of the salt, stir in 1 1/2 cups of the tomato sauce, and simmer for 2 minutes.
In a medium bowl, combine the ricotta, spinach, egg, the remaining 1/4 teaspoon salt, a few turns of pepper, and the nutmeg.
Spread 1 cup of the remaining tomato sauce on the bottom of a 9 x 13-inch baking dish. Spread about 2 tablespoons of the ricotta mixture onto a lasagna noodle. Top with about 1 1/2 tablespoons of the mushroom mixture, then roll the noodle and stand it up or lay it down in the baking dish. Repeat with the remaining noodles, ricotta mixture, and mushroom mixture. Spread the remaining 1 1/2 cups tomato sauce over the lasagna rolls. Top with the Parmesan and mozzarella, cover loosely with foil, and bake for 45 minutes. Uncover and bake for 15 minutes more.
SERVES 6
Serving size: 2 rolls
Per Serving
Calories: 500;Total fat: 18gMono: 4.3g,Poly: 1.2g;Sat: 7.5g,Protein: 26g;Carb: 56g;Fiber: 12g;Chol: 76mg;Sodium: 1110mg
Excellent source of
calcium, fiber, iron, niacin, potassium, protein, riboflavin, thiamin, vitamin A, vitamin C
Good source of
copper, pantothenic acid, selenium
 
Easy Tomato Sauce
1 tablespoon olive oil
1 medium onion, finely chopped (about 11/2 cups)
2 cloves garlic, minced (about 2 teaspoons)
Two 28-ounce cans whole tomatoes, drained and the tomatoes chopped
3 tablespoons tomato paste
1 teaspoon dried oregano
1 bay leaf
Salt and freshly ground black pepper to taste
In a large saucepan, heat the oil over medium heat. Add the onion and
cook, stirring a few times, until softened, about 5 minutes. Add the garlic and cook for 1 minute more. Add the remaining ingredients and cook,uncovered, stirring occasionally, until thickened, about 30 minutes. Season with salt and pepper.
SERVES 6
makes 3 cups;Serving size: 1/2 cup
Per Serving
Calories: 94;Total fat: 3gMono: 2g,Poly: 0g;Sat: 0.3g,Protein: 2.5g;Carb: 14g;Fiber: 3g;Chol: 0mg;Sodium: 476mg fiber

Wednesday, October 14, 2009

A Taste of New Orleans


I just got back from a great trip to New Orleans and jumped right in to try to make a Cajun favorite, Red Beans and Rice, with a healthier twist. I will caution you that this is probably not the lowest sodium dish you could choose to make, however, I have attempted to cut as much as possible.


First, I had to figure out the correct ingredients, and then I needed to locate them. After researching Red Beans and Rice on the internet, I worked out a few basics. I'd start with onion, celery and garlic to form a base, and use turkey kielbasa for the sausage. I knew I'd seen some turkey kielbasa recently in Trader Joe's and I also saw some in Harris Teeter. I ended up finding the beans at my local organic market - cans of Eden organic no salt added "small red beans." I decided to use canned because I wanted to simplify. I also found beans labelled "light kidney beans" and these would work fine too. I did not have to purchase the Cajun seasoning as I already have a mix that I make up in bulk to use when I make jambalaya. I'd be happy to provide that if anyone has trouble finding a low sodium seasoning mix. Check in the spice section of your grocery store. If you find a no or low sodium version, try that and you can always add a little salt to it if you're not too restricted.


The active time preparing this dish is pretty minimal. There's not much more to do than cut up the sausage and vegetables, and open a few cans. I had only planned to simmer for about 30 minutes, but dinner got pushed back. I ended up letting it simmer for closer to an hour, though, so it got nice and thick. I'm recommending 45 minutes, but if you have less time, 30 minutes would probably also do it.


I served it over brown rice instead of white, and with a mix of sauteed kale and spinach on the side. Pretty delicious and full of healthy protein and fiber.


Cajun Style Red Beans and Rice


(serves 4 or 5, maybe more if you don't have a teenaged boy)


1 - 2 tablespoons olive oil


1 pound smoked turkey kielbasa (look for one that is not too high in sodium), cut into about 1/2 inch to 1 inch chunks

1 onion, diced


1 stalk celery, diced


2 fat cloves garlic (use more if they're small), diced


1 - 2 teaspoons Cajun spice mix, depending on your taste


1 cup low or no sodium chicken broth


1/2 bottle beer, a little more is OK too


3 cans no salt added small red beans or light kidney beans


3 bay leaves


1. Place large pot or Dutch oven over medium to medium-high heat. Add one tablespoon of the olive oil, or enough to lightly coat the bottom of the pan.


2. Add the pieces of kielbasa and let them brown on all sides.


3. Once browned, remove the kielbasa from the pot to a bowl or plate and set aside.


4. Lower heat to medium. If pot seems dry, add another tablespoon of olive oil.


5. Saute onion, celery and garlic, stirring frequently, until onion becomes translucent, about 5 - 6 minutes.


6. Add the Cajun spice mix and stir thoroughly into vegetables. Continue to saute for another minute or two.


7. Put the kielbasa chunks back into the pot, add the stock, beer, beans and bay leaves. Raise heat and bring to a boil. Immediately lower heat to low, cover pot, and let simmer for about 45 minutes, stirring occasionally. After about 40 minutes, use the back of the spoon to crush some of the beans to thicken the sauce.


8. Taste for salt - I did not add any as the sausage is salty enough and my Cajun blend has some salt in it.


9. Remove the bay leaves and serve with brown rice.


Monday, October 5, 2009

New York Times Exposes the Problems with Commercial Ground Beef - No Surprise, but Eeeew.

Today I am both sad and disgusted at the news in the food world.  I am truly surprised and saddened by Conde Nast's announcement that it will be closing Gourmet magazine (not to mentioned pissed because I just renewed my subscription).  This is a loss to the circle of us who have a love of reading about food and cooking.  Gourmet has been the pinnacle of great food writing and photography, introducing us to new ingredients, new places and cuisines and new ways of looking at food and thinking about food.  I have had a subscription since 1990, give or take a year or two in the '90s while I was busy having babies.  I have always looked forward to receiving that glossy monthly treat, never utilitarian, always stimulating, even where the recipes were way beyond my tolerance for detail.  While I also receive Bon Appetit (another Conde Nast publication) each month, and do enjoy it as well, it just can't compete with  the quality of the writers, photographers and food editors found at Gourmet.  What could Conde Nast be thinking?  Could the ad revenue of the two magazines be so far different?

And then there's the front page of Sunday's New York Times.  Do not read further if you either have 1) a sensitive stomach, or 2) no desire to ever stop purchasing ground beef from commercial manufacturers no matter how absolutely disgusting the latest news about E. coli contamination is. 

Like Upton Sinclair in The Jungle, and Eric Schlosser in Fast Food Nation before him, Michael Moss exposes the darker side of ground beef.  While none of what he reports is actually a surprise to me (I gave up commercial ground beef after Fast Food Nation and have tried to move completely away from feedlot raised meat since reading Michael Pollan), Moss pulls no punches in exposing egregious and inexcusable lapses by both the industry and the federal government agency charged with monitoring it. 

If you're interested in reading the article and haven't already, here's the link:  http://www.nytimes.com/2009/10/04/health/04meat.html.  After tracing one particular burger that sickened Stephanie Smith during the gound beef  E. coli outbreak two years ago, and through interviews and government and corporate documents, Moss concluded that "eating beef is still a gamble.  Neither the system meant to make the meat safe, nor the meat itself, is what consumers have been led to believe." 

If you read the article, you will see that the so-called "burger" that caused this woman (Moss does note that her reaction was extreme) to become paralyzed from the waist down, was, as my favorite daughter would say "so wrong on so many levels."  Here are the highlights.  As I said above, if you have a sensitive stomach, just stop reading now and join me for my next post.


1.  Feedlot cattle are kept in small penned areas with barely enough room to move.  They defecate where they live so to speak and their hides are often coated with fecal matter.  Though there are supposed to be procedures in place to ensure that the hides are cleaned before the meat can be contaminated,  there are many slip ups and no one is inspecting each carcass let alone each piece of trimming.  Last year, workers at Greater Omaha (one of Cargill's suppliers) sued the company alleging that "they were not paid for the time they need to clean contaminants off their knives and other gear before and after their shifts."  Guess they're not paid to clean their equipment between contaminated carcasses either... 

2.  One package of commercially ground beef or burgers can come from multiple sources.  The burger that sickened Ms. Smith was composed of products from four different sources in three different states and Uruguay. 

3.  I use the word products in #2, because it's just not clear to me how this burger could even be called meat.  Moss describes the actual contents of this burger, from a package made by Cargill, labelled "American Chef's Selection Angus Beef Patties," which actually almost sounds upscale.  In this "burger" was a mix of slaughterhouse trimmings (some of which was fifty percent beef and fifty percent fat) and a "mash-like product derived from scraps that were ground together in a fourth state.  One of the sources is a company that "processes fatty trimmings and treats them with ammonia to kill bacteria" producing what it terms "fine lean textured beef."  Cargill combines these products from different suppliers to arrive at the fat content it is shooting for - in this case, about 26.6 percent fat.  Why not use one piece of meat?  It would cost Cargill thirty cents more per pound.  Moss reports that most grocery store ground beef is blended in this way.  The USDA regulations allow even meat labelled ground sirloin to be made from trimmings. 

4.  The low grade bits and scraps are more likely have come from parts of the cow that have had contact with fecal matter.

5.  Cargill does not test meat supplied to it for E. coli bacteria, but relies on its suppliers to check. 

6.  Many slaughterhouses will not sell to grinders who check the meat for E. coli.  Unfortunately, the slaghterhouses are the source of the problem, according to a senior policy analyst with the consumer group Food and Water Watch. 

7.  Just weeks before Ms. Smith's burger was made, USDA inspectors repeatedly found that Cargill was violating its own safety procedures for handling ground beef.  In that very plant, inspectors found "large amounts of patties on the floor," grinders "gnarly with old bits of meat," and one worker who commonly dumped inedible meat on the floor near the production line.  However, the USDA inspectors did not fine or sanction Cargill. 

8.  Though Cargill does check the product for E. coli once it's ground, because its meat comes from so many different suppliers, even if a burger tests positive for E. coli, the company is unable to identify which supplier provided the product that went into it.  Just a few weeks before making the burger that sickened Ms. Smith, Cargill found some E.coli in a finished hamburger, and as it couldn't identify the supplier, decided to wait to see if there was a pattern of contamination before doing anything.  (**one bright spot in the article - Since 1998 when someone was sickened by its meat, Costco checks all trimmings before grinding.  Tyson will not supply them.)

 9.  As a result of the outbreak, Cargill has agreed to increase scrutiny of its suppliers and will increase testing of finished ground beef, but will not institute testing of incoming ingredients. 

10. It takes so little E.coli bacteria to cause a contamination that there is concern of infection via kitchen counters, towels and implements that have come in contact with the meat, even if you cook the meat well enough to kill the bacteria.

What's a carnivore to do?  First, it seems that you can limit your exposure by buying ground beef made in store from a single piece of meat. The fewer pieces of meat that go into your ground beef, the less the chance of contamination.  According to the article, Publix will grind the meat for you if you purchase a piece of steak. I wonder which other stores will do so.  Obviously the safest way would be to grind your own meat but I can't imagine that's convenient for many poeple.  Next best, only purchase ground beef from sources that you can ask if they test their "trimmings".  That requires the beef to be ground in-store. 

I guess it's important to ask what cuts are going in to the meat and if they're using a slaughterhouse, whether the slaughterhouse tests for E.Coli.  It's a lot easier to ask these questions when you purchase directly from the source.  It's also arguable that simply avoiding the feedlot system and purchasing meat from small farms decreases that chances that hides, and, therefore, the carcasses, are contaminated in the first place.  Gonna cost a little more though.

Please let me now if you have any comments and ideas about all this!

Thursday, October 1, 2009

Deconstructed Manti - Sort of


A friend asked me recently how long I spend making dinner. I think that most nights the answer would be 30-45 minutes. As you know, my pantry is usually hurricane-ready and I do a lot of farm stand shopping during the weekend, so I can usually pull something together in that amount of time. Most of my go-to weeknight recipes are ones that are simple and rely in great part on ingredients I normally have. I might have to pick up some fish or shellfish or a rotisserie chicken day to day, but I try to keep kitchen time on a weeknight to a minimum. I know Rachael Ray says that her 30 minute meals are quicker than ordering take out, and I guess that's true to some extent, but it is still more effort to cook and to plan ahead to have the right ingredients. The reality is that it is easier to order in Thai food or pizza than it is to make even a basic meal at home.


However, for me, because of the need to eat healthier - watch sodium, calories, fat, etc. - and my desire for my family to eat healthier as well, I find the effort is unavoidable. It is just too hard to to know what is really lurking in the delicious carry out, for me to eat that way more than a couple of times a week. Since I do tend to eat lunch out several times a week, I try to prepare most dinners at home. Planning ahead and only choosing recipes that can be accomplished in that amount of time is how I make it work. I read many, many recipes each week. The only ones I try on a weeknight are those that I think I can squeeze in between pickup from tennis practice and delivery to drama class. Of course there are weeks when even this level of home cooking is just not going to fit into the schedule. I look at the cooking at home as a moving target.


As I don't have a demanding career now, this is a possiblility for me. I think if I didn't have this amount of time, I'd hire a family chef to do for us what I couldn't do myself. Although it seems expensive and a luxury to hire someone to prepare your meals, at least they'd be to your family's specifications. Some cook right in your own kitchen and leave your meals ready to go right in your refrigerator. It's like convenience food, but without all the additives, extra sugar, fat and sodium.


Michael Pollan recently wrote in the Sunday New York Times magazine (August 2, 2009) about how Americans, depite their love of cooking shows on TV, have given up cooking and have relegated it to a hobby akin to camping, hunting, gardening and riding horseback. His basic point is that in contrast to this trend, cooking at home is directly connected to a more healthful diet, and, therefore, to better health. It's a touchy subject, though, as the call for a large scale return to home cooking seems to some like a reversion to the 1950's for women. While Pollan opines that men can cook too, it seems to me that it does fall on women a little more heavily in many homes. In opposition to the argument that a return to more home cooking is a regression in rights for women, Pollan suggests that the move from home cooking to industrial cooking and farming was not spurred by woman entering the workforce so much as by effective marketing by corporations and the economics of the large supply of available convenience foods.

Regardless, as the evidence mounts suggesting that we can improve our health by eating fewer prepackaged and mass produced convenience foods, I feel I have no choice but to try to make this cooking at home work. So my goal is to make it as painless as possible. Full disclosure - I love to cook. But I do not love weeknight meal preparation. That is almost a different animal all together, what with all of our busy schedules. In support of cooking, take this one example from Michael Pollan's article with you: not only has mass production driven down the price of many junk foods, but items like French fries didn't become so popular until industry made it so easy for us to purchase and eat. Likewise, he notes that the mass production of cream-filled cakes, taquitos, chips and cheese puffs has made them all everyday items. He says "the fact that we no longer have to plan or even wait to enjoy these items, as we would if we were making them ourselves, makes us that much more likely to indulge impulsively." It's really hard for a home cooked meal to compete.


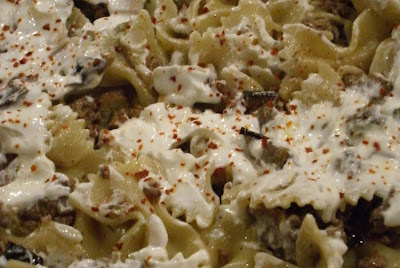
To makes things easier for myself, when I see grass fed ground lamb, I buy a package or two to keep in the freezer. They are often sold already frozen, are really fine to freeze, and are very versatile in cooking. If I can remember to defrost it, I can be a rock star around this house with one dish in particular that my family loves. This is my version of Melissa Clark's deconstructed Turkish dumplings from the New York Times food section. Even though Paul does not like eggplant, he doesn't seem to care that this dish is filled with it. And really, so what if he pushes it to the side of his plate - more eggplant for me! This time I've got grass fed lamb from Jamison Farm in Latrobe, PA. They've been coming to the new Bethesda Farm Market, which is located in the parking lot behind Jaleo on Sunday mornings. There is also a Thursday market on Bethesda Lane from 3 - 7 pm. Check it out at bethesdacentralfarmmarket.com. There is also a great fish guy there!


Pasta with Turkish-Style Lamb, Eggplant and Yogurt Sauce

Adapted from Melissa Clark, New York Times

(serves 4 - 6)

1 large eggplant

olive oil cooking spray

2 tablespoons olive oil

salt

2 large cloves garlic, minced, and kept separate

1 large shallot, minced

1 pound farfalle (bowtie) pasta, a multi grain might work here though we use regular pasta

1 pound ground lamb, preferably grass fed

Aleppo pepper flakes, if you have it, to taste, or ground chili powder.

2 tablespoons chopped fresh dill

2/3 cup plain fat free Greek yogurt


1. Preheat oven to 450 degrees.

2. Put up water for the pasta.

3. Cube the eggplant into a 1/2 inch dice.

4. Spray a baking sheet lined with aluminum foil with olive oil cooking spray and spread the cubed eggplant out in a single layer. Spray tops of cubes with the cooking spray. Sprinkle the eggplant with a little salt. Roast about 20 minutes or until the eggplant is getting brown and some bits are crispy.

5. In a large skillet, heat the olive oil over medium heat. Add the shallot and one of the cloves of minced garlic. Saute a few minutes until the shallot has softened and become slightly translucent.

6. Cook pasta according to package directions.

7. Add the gound lamb to the skillet with the shallots and garlic. Sprinkle the Aleppo pepper flakes or chili powder over the lamb. Several good pinches should do. Mix well and cook until the lamb is uniformly brown and no pink spots remain (If you are not using grass fed, you might even want to do this in a separate pan so that you can drain the meat from the fat. The grass fed lamb will not produce so much fat).

8. Add dill to skillet and sprinkle a pinch of salt. Stir eggplant into the mixture in the skillet. Taste and add salt and Aleppo pepper as needed.

9. In a small bowl, mix the yogurt with the reserved minced clove of garlic.

10. Drain pasta and add to the skillet to mix if your skillet is large enough. Otherwise, place pasta on serving platter and cover with the lamb/eggplant mixture. Top with the yogurt sauce. Sprinkle a little Aleppo pepper on top of the yogurt. Garnish with a little chopped dill.

Wednesday, September 30, 2009

Red Corn Chowder


The change of season is rarely smooth in the DC area. Many falls we go directly from blasting the air conditioning to cranking up the heat in a matter of days. This year, I'm hoping for a slower transition. Though the other day I was wearing a tank top, yesterday and today there's a definite chill in the air. It's still in the 60's (unless you're up at 6 am when it's a bit colder - I'm crazy but just making sure the darling teens have something to eat before leaving the house) but I'm starting to think about soups and using the oven again. The farm stands are piled with the bounty of both summer and fall during this bridge season. Zucchini, basil and tomatoes are sharing table space with butternut squash and kale. As a result, this is a great time to take advantage of recipes that also bridge the seasons, calling for the best of both summer and fall.

I came across this beauty on a blog called The Wednesday Chef (she's a beautiful writer - check her out at http://www.thewednesdaychef.com/), on which Luisa Weiss experiments with recipes published in the New York Times and Los Angeles Times Wednesday food sections. I had seen this Pete Wells recipe in the New York Times myself, but it just didn't click for me. After reading Luisa's description, I decided to try it after all, and it was a hit with the whole family. She made some changes and I made some more. The resulting recipe is below. It's not something I would have made several weeks ago, but it's perfect for this time of year - a hot soup calling for fresh basil and corn.

I had planned to use some homemade shrimp stock (I do remember I said I'd tell you what to do with those shrimp heads!! Keep checking back as I will get there) to make this, but completely forgot to defrost it. I think the water worked fine, but next time I might try the stock.


Red Chowder with Corn and Scallops

(adapted from The Wednesday Chef and Pete Wells)

serves 4 - 6
2 tablespoons olive oil
1 large onion, diced
2 to 4 cloves garlic, peeled and roughly chopped
1 celery stalk, diced
Half a large fennel bulb or one whole if small, diced
2 carrots, peeled and diced
Salt
4 cups fish stock, clam broth or water
4 ears corn, shucked, kernels cut off and reserved ( you can substitute frozen kernels - about 2 or 3 cups - later in the season)
1 pound potatoes, peeled and cut into 1/2-inch chunks
1 bay leaf
Red pepper flakes, to taste
1 28-ounce can low or no sodium added diced tomatoes (Trader Joe's now carries 14 oz. cans of no sodium added diced tomatoes - just use two cans)
Freshly ground black pepper
1 1/2 pounds bay scallops (you could also use cut up peeled shrimp which is how the recipe was originally written)
2 basil sprigs, leaves cut into fine ribbons
1. Set a large pot over medium heat, and add the olive oil. Saute the onion, garlic, celery, fennel and carrots in the olive oil until softened, about 10 minutes. Season with salt.
3. Add the stock or water to the pot. Add the corn kernels, potatoes, bay leaf and a pinch of red pepper flakes. Bring to a boil, cover the pot, reduce the heat to low and simmer for 10 minutes.
4. Using the back of a wooden spoon, crush a third to a half of the potato chunks against the side of the pot. Stir in the chopped tomatoes and juice, return to a boil, lower burner again, and simmer for 10 minutes more.
5. Add the scallops, stir well. Taste and adjust the seasoning, adding salt, black pepper and more red pepper flakes to taste. Let the soup simmer for 4 or 5 minutes more on a very low flame. Ladle into bowls and sprinkle with the basil ribbons. I also drizzled a little bit of delicious olive oil on top of each bowl.
Eat happily with a whole grain baguette!

Friday, September 18, 2009

Chicken Soup

I've just finished cooking my traditional chicken soup and thought I'd share the recipe. This comes down from my mother's mother, with adaptations at each generation. My mother added the sweet potato and I incorporated some of the principles of stock making I picked up in my recreational French cooking series. My sister made her version of this soup and my sister-in-law Karen also makes a version. I came along after my grandmother stopped cooking, so I only knew my mother's. In her honor, I'll call it Evie's Chicken Soup.

I'm making the soup today for Rosh Hashanah, the Jewish New Year, but I make it during the winter whenever one of has has a bad cold. You can serve it with the traditional matzoh balls (**my secret below the recipe) or with noodles. With an extra step, you can use the leftovers where stock is called for in a recipe. This is a pretty low salt recipe, so add salt to your taste. My cousin Scott used to infuriate my mother by adding salt to his bowl of soup (before tasting!) at every holiday dinner.

Evie's Chicken Soup

(serves 8 - 12)

Large cut up chicken or parts - about 5 pounds ( I like to use kosher chicken for this as it's been salted and soaked)

1 sweet potato, peeled and left whole

1 medium to large onion, peeled and left whole

4 -6 carrots, depending on their size, peeled and cut into two approximately equal lengths

4 stalks celery, trimmed and cleaned and halved as with the carrots

1 parsnip, peeled and trimmed

1 "Jewish Bouquet Garni" - I use a large handful of parsley (stems and all), dill and 10 - 12 black peppercorns wrapped up in muslin and tied with kitchen string. Feel free to substitute ground pepper. You can also omit the muslin and string and drop the dill and parsley right into the soup still tied up in the rubberband, but you will have bits of the herbs floating in the soup that way. I prefer a clearer soup.

1 - 2 Telma brand chicken stock cubes - optional. You can find these in the kosher section of many grocery stores and at kosher markets. I use one or two if the broth seems weak when I taste it. They are very high in sodium and have some MSG so I prefer to omit them. If you have a flavorful chicken you won't miss them. If you decide to use the cubes, do not add salt until the tasting stage!!!

1. Get out a large stock pot. After years of making soup right up to the edge of my pot, I finally bought myself a 16 qt. pot. Much easier! Put the chicken pieces in the pot, leaving out any livers, hearts, etc. Cover with water by a couple of inches. Today, with just under 5 pounds of chicken, my water line after the pieces were covered came up to 7 quarts.

2. Put the pot on a burner set to high and bring to a rolling boil. After the water has been boiling for about 5 - 10 minutes, skim off the foam and grey-brown goo that floats to the top. This sounds gross, but is a crucial step.

3. Lower the burner slightly and keep the chicken and water at a slow boil for about 30 minutes.

4. Once the water is mostly clear, add all the other ingredients to the pot. Bring back to a boil, then lower the burner to maintain the contents of the pot at a simmer. Cover the pot with the lid slightly ajar so that steam can escape.

5. Simmer for about 1 hour.

6. Stir the contents of the pot and skim off any obvious bits of fat. Taste the soup and add salt and pepper to taste.

7. Remove the chicken pieces to a bowl and reserve for another use - chicken salad, maybe?

8. Remove the parsnip and sweet potato and eat (or save for someone else). If you like onion, break up the onion into smaller pieces and leave in the soup. It should just about fall apart. Remove the herbs or "bouquet garni."

9. The soup is ready to serve like this, however, if you've made it a day ahead you have an opportunity to skim off the layer of fat that will rise up and solidify when you refrigerate the soup. If you would like a fancier presentation, strain the soup of all the cooked out vegetables and put just the broth back into the pot (use a strainer over another pot or bowl - do not just pour it over a colander like you are dumping pasta. I have done that - duh. Press down on the strained out vegetables to get out all the broth and flavor). You can add new, fresh carrots and celery to the broth and cook it for another 20 minutes or so before serving. This method also provides a clearer broth if you want to use it for stock.

L'shanah Tovah!

**Matzoh balls: After years of using a hand beater to make stiff peaks out of the egg whites for my mother to use in the matzoh balls, I now use a mix. They come out great.

Thursday, September 17, 2009

A Well Stocked Pantry

I've been thinking a lot about my pantry. While living in an apartment recently with virtually no pantry space, I know I had to shop more frequently and we definitely ate carry out food several times a week. It's challenging to come up with a meal at 6 pm when all you have on the shelf is a box of pasta, a box of crackers and a few tea bags. On the other hand, when the pantry gets so full that the hardware holding the pull out drawers seems to be buckling, I have to quite forcefully remind myself while standing in the store that I absolutely do not need another can of borlotti beans or another color of quinoa. Every once in a while, maybe twice a year, I try to do a massive clean up of the pantry and freezer, just to see what got pushed to the back as a result of my overzealous grocery shopping.

In putting this list together, I realize that the process of cooking at home for most meals is one that requires not just planning, but space. This list of items that I like to have available at all times for meal preparation is large and I'm not even including the obvious staples like bread, milk, juice, etc. I cook for a family of four composed of myself and my husband, and my teenaged son and daughter. This list is primarily items useful for dinner prep. If you're a baker, you know what you need way better than I do. You can also see that I do my shopping all over the place. Don't feel like you have to do so. You can find everything in one store to save time. Just check the labels for sodium and fat content and read the ingredients!!

Shelf Items

dried pasta - several shapes, some whole grain and some semolina. I like De Cecco and Barilla brands as well as Trader Joe's organic for white pastas, and I like the Barilla Multigrain and Whole Foods brand whole grain. Rustichella D'abruzzo is great too, but pretty pricey.

canned tomatoes - whole, diced and crushed. Trader Joe's now has "no salt added" diced tomatoes and I recently found a great brand of whole tomatoes at my local organic market (Mom!). Bella Terra by Racconto has a great 28 oz. can of Italian tomatoes with only 35 milligrams of sodium per serving.

tomato paste - cans or refrigerator tube which is more economical if you only need a tablespoon at a time.

Jarred tomato sauce - as I'm only using this for really short turnaround dinners, I like to buy the good stuff - few high quality ingredients and not too too much sodium. I particularly like Rao's and Paesana brands. World Market also has a really good tomato sauce with artichokes.

sun dried tomatoes in olive oil

quinoa

whole wheat couscous

rice - Uncle Ben's brown rice and brown basmati as well as regular basmati rice. I also keep boxes of Trader Joe's frozen quick cook brown rice in the freezer - the individual bags cook up in like 2 minutes.

barley - great for adding in to soups in winter

oils - canola and olive. I keep two kinds of olive oil - one for everyday cooking and for use cooking with heat (I like Zoe and the Costco 1.5 liter bottle of Filippo Berio organic, cold pressed oil). For a summer tomato salad or for drizzling and finishing dishes, I use an oil from San Luis Obispo, California called Robbins Family Farm Ascolano, that I found at the Kensington farm market. There is a stand there and at the new Bethesda farm market where you can sample several oils to see what is to your taste. Many stores also allow you to taste before buying. Look for cold pressed as it retains more of the healthy antioxidants and vitamins. If you're getting fancy with salad dressings, maybe also some walnut oil (keep it in the fridge and check it if it's been sitting around as it goes bad quickly).

Olive oil or vegetable cooking spray

Vinegar - I like Unio Moscatel vinegar for an all purpose "red" wine vinegar but most brands are just fine. I also keep sherry vinegar and rice vinegar for more specialized recipes. Balsamic is tricky as the good stuff is outrageously expensive and not found in most grocery stores. Look for one that has actually been aged.

sweeteners - brown sugar, white sugar (I am now using pure cane sugar), agave nectar, honey, pure maple syrup

flour - I do so little baking that when I do it is generally to try something healthier. I mostly use white whole wheat flour for that. It can be used one for one in baking and is not as refined as regular flour. I also keep some white flour for that rare cake and for occasional breading of chicken or fish.

bread crumbs - I like to keep a canister of this because who really wants to make their own all the time? Whole Foods has a great whole wheat version that is very low in sodium.

spices - I have tons, but at a minimum, kosher salt, black pepper, chili powder, ground cumin, ground coriander, some kind of hot pepper ( I really like Aleppo now - thanks Glenn!), curry powder, cinnamon and paprika.

dried porcini mushrooms - reconstitute quickly in hot water and great for soups and sauces

dried cranberries - great in oatmeal, salads,

mustard - dijon and wholegrain

low sodium stock - I like the shelf stable boxes which you can reseal and refrigerate for later use. I keep chicken and vegetable and in the winter I keep beef as well.

oatmeal - quick cooking and old fashioned

canned beans - black, cannelini, garbanzo, pinto, kidney. Look for low sodium and/or rinse them well before using.

vermouth - a great substitute for white wine in a recipe. Lasts a long time and the flavor is milder than some wines - no oak to fight with your recipe.

bottled salad dressing - look for one with few ingredients and lower sodium. I've been buying Lucini brand lately. Really tasty!

low sodium soy sauce - Trader Joe's is terrific - it's even made in Japan. Look for ones that have few ingredients, the primary one being soy.

If you do much Asian cooking, add in fish sauce (nam pla), peanut oil, hoisin sauce, sesame oil, sriracha and or chili garlic sauce.


Fresh Items

I always have:

onions
shallots
garlic
carrots
celery
tomatoes - in season
eggs

The first few are the base of almost every dish in French, Italian and Spanish cooking.

I almost always have:

Fage fat free Greek yogurt
lemons
limes
ginger
parsley (you can freeze this too)
baby spinach (I throw it into most soups in the winter)
cheese - Parmigianno Reggiano, goat and sometimes mild feta
bananas -not local, not seasonal, but we love them all year round and they're great in healthier baked goods, especially when they are starting to get brown.


Freezer Items

chop meat - if you eat meat, keep some frozen. Unlike more tender cuts of meat, it will not matter much in your final dish. If you have this, you can always make a last minute chili, meat sauce or meatballs. I like chicken, turkey, lamb and/or grass fed beef for this. Trader Joe's also has frozen turkey and beef meatballs that are pretty good in a pinch.

Frozen shrimp - most of what you get in the grocery store has been frozen anyway... Look for U.S. and/or wild

nuts - Walnuts, almonds, pine nuts. I keep all but small portions in the freezer because I've read they keep longer. Who knows?

frozen vegetables - chopped spinach, corn, edemame, peas

frozen fruit - for smoothies

I'm sure I've left out some of your favorites. Please write and let me know! Also, I'd love to hear your comments about any of the above.

Wednesday, September 2, 2009

Mixed Grill - Vegetables, That Is

This dish is just amazing. It comes from my sister-in-law, Liz, and is healthy as can be. The first thing you have to do is get the right pan for cooking vegetables on the grill. I found the perfect one at Bed, Bath and Beyond and it was under ten dollars. It's a non-stick pan about the shape of a wok, with holes all over it. It holds a large amount of cut up vegetables and is easy to clean.

I made this just last night and forgot to photograph the results so you'll have to trust me that it is colorful and appealing as well as delicious and healthy.

I am not even going to write this out as an actual recipe it's so simple. Just fire up the grill if you're using coal, and then cut up the vegetables. If you're using a gas grill, you can light it after cutting the vegetables. Medium heat is best -- not too hot -- you don't want the vegetables to burn, just soften and get some attractive grill marks and flavor.

Cut up a combination of vegetables into bite sized pieces. I would recommend always using onion for flavor, but any combination works. Last night I used about half an Asian eggplant (long, skinny kind), a small zucchini, two large onions (one red and one white) cut into wedges, a yellow pepper, and some broccoli. Everything but the broccoli was from the farm stand. I like to add some cherry tomatoes at the end just for a little extra flavor. They also provide a little "sauce" to the mix.

You'll want to spray the pan with cooking spray or olive oil from a mister, and either spray the vegetables as well or put all the cut vegetables into a Ziploc with a tablespoon or two of olive oil and mix it around so that all are lightly coated. Put the vegetables in the pan on the barbecue and sprinkle lightly with salt and pepper. If you like, you can also sprinkle on some other herbs or even some garlic powder.

The vegetables take a while to cook -- that's why you should wait to add the tomatoes if you're adding them -- they cook very quickly. If you're grilling anything else that cooks quickly, start the vegetables first. Depending on the heat of your grill, it could take anywhere from 20 to 30 minutes. Check the pan and stir up the vegetable mix frequently, but between stirring, close the top of the grill. When the majority of the vegetables seem soft and slightly charred, add the cherry tomatoes if you're using them. Cook for about 5 more minutes. The tomatoes should look slightly shriveled but not burst when done.

You can serve this as a side dish with meat or fish or as a main dish with some pasta or quinoa and a little cheese such as mozzarella, parmesan or goat cheese crumbled on top.

Tuesday, September 1, 2009

It's No Bargain

I am really not getting on that well worn soapbox here. Really I'm not. But what can you do when media stars align, so to speak? I have mentioned before the concept that cheaper food might not be such a bargain if it harms our health. I wrote before in the context of beef. Our mainstream model of corn-fed, feedlot raised livestock quite likely produces a meat that is inherently different than the grass-fed variety. Sadly, it is not different in a good way. Grass fed livestock produce meat higher in Omega-3s and other healthy nutrients, in part, due to the grass, and which are generally not injected with hormones and antibiotics.

Just recently, the Washington Post ran a column by Ezra Klein which makes a similar argument about shrimp. He quotes a new book, Cheap: The High Cost of Discount Culture, by Ellen Ruppel Shell. While no one would object to paying less for good food, this column discusses how cheaper shrimp today are simply not the same as the shrimp we ate as children. Much of the shrimp available at a low price today are farmed in Thailand, according to Shell. As Klein put it, "the little critters are covered in antibiotics, pesticides and disinfectants." Yum.

Based on Shell's book, Klein says that "the taste is different, the nutrition is different, the accompanying chemicals are different, the impact on the environment is different, the waters it lived in are different, the food consumed is different."

This doesn't even take into account what Klein says are documented abuses by some of the Thai companies: migrant labor, child labor, worker torture and rape. Who knew?

I do know that I have made an effort for some time to purchase wild shrimp from USA when available. Harris Teeter ($6.98 per pound in today's flyer) often has them as does Whole Foods. Giant and Safeway sometimes carry them as well. Much like with salmon, the wild version is tastier and as we are learning, healthier and better for the environment. With careful shopping, you can find both wild shrimp and salmon for less than platinum rates. I just purchased a huge fillet of wild sockeye salmon at Costco!

I am very intrigued by Marvesta shrimp, though, and would love to get some. Marvesta is a shrimp farm on the Eastern Shore of Maryland that produces farmed, fresh, environmentally friendly shrimp with no hormones, no chemicals, no antibiotics and no preservatives. Their website describes their facility as "bio-secure." Some of the best chefs in the area are using these shrimp. Unfortunately, the demand by chefs is high and production is still low so there are not many to be had retail, though that option exists on their website. I have been checking from time to time to see if there are any available but not yet. Their prices are reasonable for clean, fresh head on shrimp.

Just a few days after the Ezra Klein's column in the Post, I came across the cover article in Time magazine, "Getting Real About the High Price of Cheap Food." Time says "A food system -- from seed to 7 - Eleven -- that generates cheap food at the literal expense of healthier produce is also a principal cause of America's obesity epidemic. At a time when the nation is close to a civil war over health-care reform, obesity adds $147 billion a year to our doctor bills."

A funny kind of Kismet.

Here's a non-recipe for shrimp that is so easy and pretty foolproof. Just another way to cook shrimp that will later be tossed into something else from shrimp salad to a veggie pasta, or served as a main dish with vegetable and perhaps couscous on the side. Try to find some wild Gulf shrimp for this. I'm still waiting to try the Marvesta. When I get some, I'll provide some ideas of what to do with the heads.


Roasted Shrimp


This recipe works for any amount of shrimp. I usually buy about a pound and a half for my family as the amount is much less once you peel the shrimp. Serve this with anything you like shrimp with - or even roast some broccoli right along with it (put the broccoli in first and add the shrimp after about 10 minutes). You can add whatever seasonings you like or none at all if you're using the shrimp in something else.

I use a half sheet or jelly roll pan lined with aluminum foil for this. Preheat oven to 400. Lightly coat the pan with olive oil or cooking spray. Toss the peeled and deveined shrimp with thinly sliced garlic, a little salt and pepper and spread out on the pan in a single layer. Roast for 5 - 10 minutes. You can check them after five minutes too see if the flesh has turned opaque with the telltale pinkish-orangey striations of a cooked shrimp. Feel free to leave out the garlic.

Wednesday, July 22, 2009

Lessons Learned

Home. Sweet. Home. Now that we are back in our house and have full use of the kitchen and pantry, I have some perspective on cooking with both limited implements and a limited pantry. In our rental apartment, which, in an odd splash of symmetry, was an awful lot like Paul's and my first apartment in Los Angeles, we had only the very basic set of cooking utensils and pots provided by Marriott (adequate for a single working young adult who eats out nightly). Don't misunderstand - this was a nice apartment. When Paul and I first lived in one like it, we thought we were living huge. Now, however, with two teenagers and a cooking habit supported by an extremely well equipped home kitchen, I found similar amenities limited. I even had to purchase a large knife and wooden spoon as there were none. To further complicate cooking, we only had about two shelves for pantry items. And, because we knew we'd be there only about one month, we didn't want to buy too much.

All in all, I was cooking under conditions that are actually quite familiar to many people today. I found that we did carry out and eat out dinner more. Plus, my kids succumbed to the free donuts in the lobby way more often than I care to acknowledge. I was definitely reminded of the reality of preparing dinner when you're not prepared.

So now that we're home, and although busy, back to our overstocked kitchen, I have already begun the return to our usual manner of eating. The first morning back I went to the farm stand and loaded up on fruit (green plums, blueberries and the sweetest marble sized apricots), vegetables and herbs(chard, carrots, cauliflower, spring onions, corn and basil), tomatoes and eggs. I then did some staple shopping at Safeway and a quick trip to Balducci's for a few gourmet items. Our fridge is bursting and the pantry shelves are filled once again.

My system is not scientific. I don't sit down on Sunday evenings and write up menus for the week, although if that works for you, great. The bulk of my menu planning occurs while at the farm stand on Saturday morning when I see what looks good. In my head I balance the beautiful zucchini with Paul's' extreme dislike of all summer squash-like vegetables. I think about what else I would need to turn the farm stand bounty into several meals for my family. In summer, I always buy whatever berries are in season and I always buy tomatoes. I then fill in with grocery store items later that morning, or if possible, early Monday morning when the stores are still pretty empty. I usually have to fill in later in the week as we run out of lettuce, orange juice and bread. Many years ago, when I worked full time and had au pairs living with us, I made it a rule to grocery shop only once a week. "The list" lived on a magnetic pad on the side of the refrigerator and if it wasn't on there, we didn't get it. Apart from an occasional emergency trip for milk, we pretty much stuck to it.

While at the apartment, I thought about creating two lists for the blog. One would include kitchen implements that I think are essential and the other would be pantry items to keep on hand to help avoid the last minute carry out dinners. Please let me know if you think either or both of these would be helpful.

On a slightly unrelated note, I was delighted to see no salt added diced tomatoes at Trader Joe's the other day. As I was in a Virginia location, I was also tickled to be able to browse and purchase from their extensive wine section. Wish Montgomery County wasn't so bossy!